Showing posts with label cards. Show all posts

May 25, 2012

Stamp Carving 101...faux woodcut stamps

Hello again...I'm back with some more of Julie Fei~Fan Balzer's Stamp Carving 101 course...this lesson was  all about recreating the look of woodcut stamps with carvable rubber.  Basically its easy, simply don't remove all the excess and try to keep what you leave as random looking as possible.  Here is my design:


I drew 5 simple flowers in a row, and because my design was so simple...I left alot of the background to create a fairly heavy woodcut pattern and balance this out.  It is quite possible to go back though and remove more and more rubber to create a more subtle look if you prefer that.

Simply stamped in black on cream cardstock is my favourite way to show this design off:


But you can change the look dramatically by using different inks...here i've used rainbow pads, and for the bottom right I stamped in Versamark and used chalks to colour it:


So what is stopping you..?  If you still haven't had a go...go on...its easy!

April 15, 2012

Bubbly Scrumptious...another card for you...


i've designed another very simple card for the Bubbly blog this week...its here if you want to see it :0)

i am trying out a cleaner, simpler style...what do you think...does it need MORE..? ;0)

April 03, 2012

Carving out a word for myself...

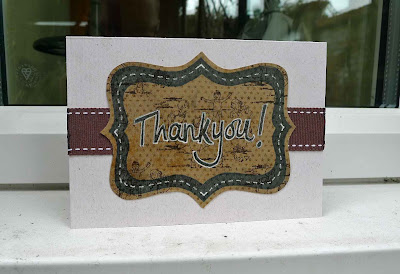
I'm still loving my adventures in Stamp Carving with Julie's class...and although i skipped Lesson 7 which was carving an entire alphabet...I was super keen to have a go at Lesson 8, carving a single word stamp.  The word that I've been needing alot lately is *Thankyou!*, so it didn't take me long to choose my word...but yours could be anything if you're having a go...your name for example...or a word you've made up, even...we have plenty of those in our house ;0)


The most important thing about carving a word stamp, or any stamp with text, is that the letters and numbers if you use them must be the right way around when you stamp them...which means they must be the *wrong* way round when you carve them.  This is easily achieved by writing your text in pencil and transferring it onto the rubber by ummm...rubbing with your finger nail.


Now that i've made my stamp, i had to have a go with it instantly...so i've made this very simple thankyou card, suitable to send to almost anyone for any little something they've done for me...and then...i've created another slightly more advanced one...using doodling...and...


did you notice that i carefully made my word stamp to fit inside my bracket frame stamp!!

Its so versatile being able to design what you want in whatever size you want...and co~ordinating with other stamps you've created :0)

I'm totally hooked now...and tomorrow {all being well} i hope to share my favourite stamp yet...a faux wood block design that i hope you'll love as much as i do!

March 26, 2012

Bubbly Scrumptious...

...did you see my card over on Bubbly Scrumptious today..?  click here to view it :0)

i'm sorry i can't show you a picture here...but click the link and see if you can spot my mistake!!!

February 13, 2012

Bubbly Scrumptious update...Valentine projects...

have you been over to the Bubbly Scrumptious blog to see my latest creations...i've gone all romantic for Valentine's day :0)  if not...just click here!

who said Valentine's have to be red or pink, eh? ;0)


February 05, 2012

a touch more Midas...


...this time with FlitterGlu and gilding flakes!


 i've finally gotten hold of a pot of the magical FlitterGlu by IndigoBlu and i have to let you know i am massively impressed...finally a gilding glue that does exactly what it says on the tin {actually its not in a tin...but allow me a little poetic licence}.  this stuff is amazing, no hanging around, no heating to the magic {and tricky to spot} moment...and no level of detail on a stamp that is too fine for this stuff!!  Brilliant.  the only bummer i can find to it at all is the smell...but its worth opening the window to use in my opinion :0)


See...pretty impressive stuff, huh?  see how it has picked up the tiny border and and the distressed script text...all the details...no hassle.  sorry the picture of the whole card is a let down...its really quite pretty in real life as i hope the close ups show!

January 22, 2012

the Midas touch..?

Hi there everyone...today i've come over all Midas...and had a huge desire to emboss everything in gold!
As you can see i'm still bonkers about puzzle cards...and in fact i'm getting complaints from people who get regular non~puzzle cards now, too!!  This one is for my Mum who's Birthday is next week...


i find it very difficult to photograph gold embossing and make it look sparkly and as it does in real life...hopefully the close~up gives you a slightly better idea..?  if any of you have any tips out there for photographing shiny surfaces, i'd love to hear them...so please share them in the comments form!  Thanks :)


i've coloured the whole background in a couple of shades of Brilliance ink and then stamped the lovely heart shaped balloons several times in Teal Versafine.  if  you look closely you'll see that i've stamped it both ways up, and on the left of my puzzle i've made a border using just the tails.  {The stamp is from the Little Feet sheet by Paperbag Studios and is so useful...i love it!}

i then overstamped most of the images and embossed in gold, not inking my stamp between impressions so that some places take the embossing more than others.  i added a Happy Birthday stamp, also embossed and swiped my embossing pad all around the edges to give them a touch of the Midas too.  

all i have to do now is break it apart and pop it in an envelope...oh...and think of a present to go with it ;0)

November 29, 2011

Bubbly Scrumptious update...a pop~up starcard for Christmas

hi all,

just to let you know i have a project up over on the Bubbly Scrumptious blog today...just click here to see it!


i hope you like it!
alix

October 15, 2011

obsessed with puzzle cards...

oh me, oh my...i've only gone and made another one! ;0)


This one uses a lovely set of Andy Skinner Christmas stamps {the robin and the icicle type border}, and is super pearly and pretty irl.  It was so funny watching Ruth try to assemble it in the dim lighting of our local Chinese restaurant...lol


As always i coloured the reverse of the puzzle too before writing my Birthday message :0)

So...what i want to know now...is have you made a puzzle card yet?  i've had super feedback from those that received them in the post...Granny spent all day playing with hers! *go Gran*

October 12, 2011

can you tell what it is yet..?


If you'd like to see this puzzle completed...just pop over to the Bubbly Scrumptious blog and see the finished article..here!

October 06, 2011

30 minute Thursdays...a properly puzzling card!

Hello again Thursday crafters!

This week's offering is a properly puzzling card...literally a card made onto a puzzle...that you disassemble and pop into the post for the recipient to recreate themselves!  Cool, huh? ;0)  It can be made as my example shows from a pre~bought jigsaw blank {available in lots of craft shops} or by reusing an old jigsaw and sanding off the picture...so you have no excuses not to have a go!! 

Warning!
You'll see from the photos that i have used a selection of the fabulous Dylusions mica and non~mica sprays to create this design...so do work in a protected environment and not over the dining room carpet...and if you've got to go to work later...wear gloves!! lol  These sprays are gorgeous...but they do get everywhere...so don't forget your non~stick worksheet...

To begin with, spray some colour onto the blank jigsaw in a light colour, leaving some areas uncoloured:


Next layer some mica infused colours over and around the first colour and allow to blend.  Shake the bottles to allow some splattering to occur:


Move your jigsaw to one side to dry.  Spritz the ink on the non~stick sheet with a little water and create co~ordinating embellishments by allowing plain paper flowers to absorb the colour:


Dry these with a heat gun and draw in two stalks for your flowers using a large marker pen:


***Glue your flowers onto the stalks, being careful not to glue over the lines of the puzzle ;0)***

Now add a little stamping around the edges of the puzzle {this makes it more fun to put together} and if you wish a message at the bottom:


To finish the design, swipe a permanent black inkpad all around the edges, add a little pen work with a fine black pen and glue some gems into the flower centres:


Turn the puzzle over and create a simpler version on the back...and write your message:


Now all you have to do, is heat set all the ink, and pop all the separated puzzle pieces in a sturdy envelope...and wait for the excited call when your properly puzzling card reaches its destination!

I do hope you've liked this idea...and as always i'd love to hear what you think...
happy crafting,
Alixxxx

September 26, 2011

Bubbly Scrumptious update...a little Christmas sparkle

hi all,
just to let you know that over on the Bubbly blog this week i have a quick, vintage style Christmas card for you to make...you can see it here :0)


July 25, 2011

Bubbly Scrumptious update...embossing with Tando!

its amazing how much fun you can have with a Tando mask and some sandpaper...come and see what i've been upto on the Bubbly blog!  click here :0)

June 21, 2011

another easel card...


this one was for Katy {Craft Stamper Ed...so i figured i'd better make a stamped card}...and used one of the lovely lace flowers i'm so into at the moment.
apologies for the dodgy photo but i took this in a super hurry as i was getting ready to go out for her party!!

May 15, 2011

making the most of 30 minute Thursdays...


sometimes i even take my own advice...lol...and this week when i needed a Birthday card i looked to my 30 minute Thursdays and made an easel card with a lace flower on it! thats 2 prompts for the price of 1 in my book ;0)

i'm happy to say jaki seemed to love it...and i hope you continue to have a stupendous Birthday week, hon xxxxx

May 05, 2011

30 minute Thursdays!

Wow its Thursday again...i swear i have no idea what time of day it is, let alone which day of the week what with all these Bank Holidays and royal events! So...thinking it probably is Thursday...i've designed a rather cute little any occasion card that can be completed in 30 minutes...i hope you like it!


Its basically an easel card, so first off take a white card blank and fold the front flap in half inwards, to create the triangle shape, as you see in the photo below :) That was easy, huh? now all we have to do it decorate it and create a step!


i've glued a strip of bobbly trim to the bottom of the card and then added my message {a rubon} and a gem to a strip of cardstock which i've attached with foam to raise it up. this is what holds the triangle flap in place.

i've decorated the top section by covering it with a scrap of pp that i adore {its a DCWV one} and edging it with ink from a big brush pen. my main embellishment is a simple stamped flower which i've coloured directly on the stamp, huffed on...and stamped onto white cardstock and cut out. the india ink pens i've used are one of my favourite things atm...and the stamp i've used is one of my hand cut ones...but you could use any flower you have to hand...or any suitable image you choose...


once my flower was stamped and cut out, i simply matted it with a paper frame i had and backed it with another scrap of pp...3 gems and a ribbon bow later...and its done! simply adhere the whole thing with more foam tape {only on the bottom half of the design so you can fold it, remember}...and the best thing about these cards is that even though they have a lot of dimension to them standing up...you can fold them flat for posting and fitting in the envelope...yay!


here is the stamp i used and the pens in case you're interested in them...they are brilliant...but if you don't have them...don't worry...just use whatever pens you have got :)


ok...hope you like today's post and will give it a go...and if you do...remember to pop back and tell me all about it!

April 11, 2011

bubbly scrumptious update...


just to let you know my latest post is up at Bubbly Scrumptious...i've found a new use for Viva Croco paints and created a rather cute gift box and card combo! i do hope you'll pop over and leave me some love...or at least *wave*...here!

February 14, 2011

Happy St. Valentine's Day...


...hope you're all being totally spoiled today...and do pop along to the bubbly scrumptious blog to see the Valentine's card i made for my darling hubby...the link is here.
love, alix

February 07, 2011

bubbly scrumptious update...


...do pop along and see my latest projects on the Bubbly Scrumptious blog...today i've made a ring and a card from one Tando chip shape for you...i hope you like them!