Showing posts with label stamping. Show all posts

May 28, 2012

An unseasonal LO...Christmas at Berko!!

Hi everyone...its beautifully sunny here and so hot you could fry eggs on the pavement...so i thought i'd scrap a very unseasonal photo and immerse myself in cooler times. ;0)


I only allowed myself to use papers and cardstock from my scraps pile...and i even created the background pp with a scrap, some Versamark ink, a few mica powders and my hand carved damask stamp...did you spot it?
{To see the LO more clearly just click on it and it will pop up big enough for you to see all the details :0) }

The embellishments all came from the tray on my desk where I keep leftovers from other projects.  The paper flowers are both dipped into UTEE after being coated in Brilliance ink, and the wire flower is held in place by a cute brad that was also in my tray.

I stamped the journalling block using an ancient stamp and rounded the corners to match the tag i've used (upside down) on the top left.

Its another case of, not feeling great so throw it all at the page and see what happens...but i'm quite liking how it came out! :0)  And how can you fail to love the cheeky look on my BIL's face!!

I do hope you are managing to keep cool...and not get burned...but taking the opportunity to have an ice~cream or two!

May 25, 2012

Stamp Carving 101...faux woodcut stamps

Hello again...I'm back with some more of Julie Fei~Fan Balzer's Stamp Carving 101 course...this lesson was  all about recreating the look of woodcut stamps with carvable rubber.  Basically its easy, simply don't remove all the excess and try to keep what you leave as random looking as possible.  Here is my design:


I drew 5 simple flowers in a row, and because my design was so simple...I left alot of the background to create a fairly heavy woodcut pattern and balance this out.  It is quite possible to go back though and remove more and more rubber to create a more subtle look if you prefer that.

Simply stamped in black on cream cardstock is my favourite way to show this design off:


But you can change the look dramatically by using different inks...here i've used rainbow pads, and for the bottom right I stamped in Versamark and used chalks to colour it:


So what is stopping you..?  If you still haven't had a go...go on...its easy!

April 03, 2012

Carving out a word for myself...

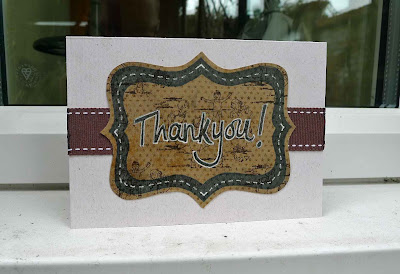
I'm still loving my adventures in Stamp Carving with Julie's class...and although i skipped Lesson 7 which was carving an entire alphabet...I was super keen to have a go at Lesson 8, carving a single word stamp.  The word that I've been needing alot lately is *Thankyou!*, so it didn't take me long to choose my word...but yours could be anything if you're having a go...your name for example...or a word you've made up, even...we have plenty of those in our house ;0)


The most important thing about carving a word stamp, or any stamp with text, is that the letters and numbers if you use them must be the right way around when you stamp them...which means they must be the *wrong* way round when you carve them.  This is easily achieved by writing your text in pencil and transferring it onto the rubber by ummm...rubbing with your finger nail.


Now that i've made my stamp, i had to have a go with it instantly...so i've made this very simple thankyou card, suitable to send to almost anyone for any little something they've done for me...and then...i've created another slightly more advanced one...using doodling...and...


did you notice that i carefully made my word stamp to fit inside my bracket frame stamp!!

Its so versatile being able to design what you want in whatever size you want...and co~ordinating with other stamps you've created :0)

I'm totally hooked now...and tomorrow {all being well} i hope to share my favourite stamp yet...a faux wood block design that i hope you'll love as much as i do!

March 24, 2012

Stamp Carving 101 lesson 6...damask!


This has to have been one of the most surprisingly enjoyable lessons so far...damask designs and I are not natural bedfellows as they tend to be a bit subtle {tone on tone} for me...but I had a go at designing my own and I absolutely love it!!!


I started off my making a drawing, which I did half of, and then folded the paper to transfer the design to create a symmetrical pattern...here is the drawing and the finished stamp together:


when its printed out it looks like this:


pretty cool, huh! ;0)
But don't worry if  you're intimidated by the idea of drawing  your own damask design...Julie provides templates for people who want to use her designs!

If you look closely at the stamp you'll see that i carved it really deeply to give a good clear impression and create a really bold damask design.  This is personal choice of course, you could go for a really dainty design...but i've never been accused of being dainty!!! lol


and here it is stamped onto an old napkin in fabric ink...all i need now is a plain white table cloth and i'm going to stamp it all over to match the napkins...and who knows...i might even be a big brave girl and iron them so they look a bit better!! ;0)


As always i'd love your feedback...what do you think of my design?  do you like it stamped in pink...or do you think it would have been better in a dark colour?  i'm waiting to find some deep purple fabric ink actually to do the table cloth and the rest of the napkins...watch this space!

March 21, 2012

Its a Creative World...

...have you been over to the Creative World blog lately...today there is another stamp carving post with a journal page by me...but also details of the rather exciting blog hop coming!!


March 19, 2012

lesson four in Stamp 101...a set of stamps

This was a fun lesson...and one that i've done very roughly and rustically...in fact...now that i've seen my stamps in huge on the screen i may actually go back and tidy them up a bit *out of shame* ;0)

The idea of this lesson was to get out heads around creating shaped stamps and in sets that are co~ordinated so they work together.  Julie had a really cute bunting set to share and some chevrons a bit like these...i decided to make mine chevrons as i think they are really useful for corners of for making fun borders like the wonky one i test printed below:

I think small image stamps are often overlooked in terms of their usefulness...just look at this rather funky quitled star type pattern i've created by repeat printing two of my chevrons to make a sort of flower shape...


and the sort of 3~D box i've created with a tiny square and a chevron...

there must be no limit to the number of variations of these sorts of designs...so i think i'll go and play a bit more!

i do hope you're enjoying seeing the fruits of my carving labours...and do join julie's class...she's awesomely funny and a great teacher to boot!


March 13, 2012

lesson 3 in stamp carving 101...

My head cleared a little more today so i decided to have a little go at some simple, soothing stamp carving and today i opted for Julie's lesson 3 of the stamp carving 101.

Julie's design was a contained chevron pattern that could be repeat stamped seamlessly and was cool...but i couldn't see myself using it much...and as energy and coordination are in such short supply i thought i'd adapt it to a border that i was much more likely to use.  No point wasting time, energy and rubber on something that doesn't get me itching, right? ;0)

To help you follow along with my design process...i've stamped out my stamp at various stages during its evolution {as Julie recommends} and you can see the progress from simple chevron lines in stage one, adding the stitched border a la Julie in stage two, and the addition of shading in stages three and four:


its funny how doing it like this is less intimidating too...if i'd drawn out the finished stamp right from the beginning...i might have been tempted to think...help!  *that's going to take all day*...but actually...the whole process took twenty minutes from start to finish! :0)


and here is a shot of the stamp as it is when inked...and another of the tag I've created using my funky new border stamp!  I have to say, i'm rather chuffed with this little border stamp and can see myself using it in my journal or on scrapping pages in the future too...so well worth the effort, i'd say!


March 10, 2012

Julie Fei~Fan Balzer's Stamp 101 e~course...

As a little Birthday treat to myself, I decided to join Julie's Stamp 101 e~course...a step by step course to the basics of stamp carving...and its BRILLIANT!!  I would really recommend this class to anyone who fancies a go at carving your own stamps :0)  click here to be taken to her e~course page.

I've done a little stamp carving {and in the old days lino cutting when I had strong fingers}, so i wasn't sure how much i'd learn...but what with the chemo~fog and all i thought a little prompting in the form of daily lessons might get me up and running...and it has!

Now, i'm only on lesson 2...but here is what i created from Julie's easy to follow nesting stamp tutorial.  Her's was straight lines...mine is circles...and very rustic wonky circles at that!


Here is what you get when you stamp these 2 stamps though using different colours {i've used Stazon which is why its staining the stamps}.


Perhaps this makes it clearer...I started with this drawing...and ended up creating this cute little tag!


The observant among you will notice that i haven't told you how to do this...and that's because i don't want to steal Julie's thunder, after all her hard work setting up this super class...i really think you ought to join it and get all the details from the horses mouth...so to speak! ;0)  Also...she explains it much better, in video format than i could ever do here!!

Ok, that's it for now...i'll be back when i can manage it...and in the meantime...i hope you're all having a crafty time out there :0)

February 17, 2012

a little bit of She Art...

do come on over to the Its A Creative World blog and see my post all about She Art today...just click here :0)


February 13, 2012

Bubbly Scrumptious update...Valentine projects...

have you been over to the Bubbly Scrumptious blog to see my latest creations...i've gone all romantic for Valentine's day :0)  if not...just click here!

who said Valentine's have to be red or pink, eh? ;0)


February 06, 2012

constantly amazed!

i am constantly amazed by just how many beautiful effects and textures can be created with a little Distress Ink and some water...


now...i have to go and play with some of my other favourite colours...back soon!

February 05, 2012

a touch more Midas...


...this time with FlitterGlu and gilding flakes!


 i've finally gotten hold of a pot of the magical FlitterGlu by IndigoBlu and i have to let you know i am massively impressed...finally a gilding glue that does exactly what it says on the tin {actually its not in a tin...but allow me a little poetic licence}.  this stuff is amazing, no hanging around, no heating to the magic {and tricky to spot} moment...and no level of detail on a stamp that is too fine for this stuff!!  Brilliant.  the only bummer i can find to it at all is the smell...but its worth opening the window to use in my opinion :0)


See...pretty impressive stuff, huh?  see how it has picked up the tiny border and and the distressed script text...all the details...no hassle.  sorry the picture of the whole card is a let down...its really quite pretty in real life as i hope the close ups show!

January 22, 2012

the Midas touch..?

Hi there everyone...today i've come over all Midas...and had a huge desire to emboss everything in gold!
As you can see i'm still bonkers about puzzle cards...and in fact i'm getting complaints from people who get regular non~puzzle cards now, too!!  This one is for my Mum who's Birthday is next week...


i find it very difficult to photograph gold embossing and make it look sparkly and as it does in real life...hopefully the close~up gives you a slightly better idea..?  if any of you have any tips out there for photographing shiny surfaces, i'd love to hear them...so please share them in the comments form!  Thanks :)


i've coloured the whole background in a couple of shades of Brilliance ink and then stamped the lovely heart shaped balloons several times in Teal Versafine.  if  you look closely you'll see that i've stamped it both ways up, and on the left of my puzzle i've made a border using just the tails.  {The stamp is from the Little Feet sheet by Paperbag Studios and is so useful...i love it!}

i then overstamped most of the images and embossed in gold, not inking my stamp between impressions so that some places take the embossing more than others.  i added a Happy Birthday stamp, also embossed and swiped my embossing pad all around the edges to give them a touch of the Midas too.  

all i have to do now is break it apart and pop it in an envelope...oh...and think of a present to go with it ;0)

January 15, 2012

beginning again...art as therapy!

do you ever completely lose all sense of yourself?  in the last 5 months i have been diagnosed with breast cancer, had two surgeries which have altered my body forever and embarked on a journey of chemotherapy that has taken my hair, my energy all that remained of me.  i am no longer the *busty blonde* i have come to think of myself as...and so i'm currently going through a bit of an identity crisis!!  in order to help me tackle this, i decided to create this journal page as a way to look back at a time when i was very clear who i was {and heaven help anyone who got in my way ;0) }...maybe, from looking back at the deeper essence of who i was and who i am...i'll eventually come to a place of acceptance...and a new sense of *me*...afterall...i've got more to me than boobs, right?


i studied art as therapy at universitiy and am a firm believer that the most crucial impact of art for me is the process...the act of letting go and expressing my emotions and *being real*.  art can be very healing and also revealing...if we let ourselves go and explore the inner workings of our psyche...so here i am...exposing myself and making myself vulnerable...its not something i generally share with people...but maybe there are other of you out there with your own struggles and emotional journeys who might be inspired to have a go yourselves.


its a thoroughly mixed~media affair this page...i've used water colours, water soluble pastels, acrylic paint, stamping, doodling, paper punches and brush pens as well as masking tape, tissue paper and a sponge!  i guess that represents that i don't want to be constrained, or categorised! 

December 28, 2011

a little wine...bottle!

Hi there bloggers...i do hope you've all had a wonderful Christmas and are looking forward to the New Year celebrations.

Despite alot of illness throughout the whole family...we all managed to be well enough on the big day to spend a few hours together and had a thoroughly fabulous time...which i plan to scrap later today! :0)  Have you scrapped your day yet??
Now...back to the wine...its not a Christmas whine...but a Christmassy bottle of mulled wine...a perfect but inexpensive gift {depending how much brandy you put in it}.  I decorated this empty brandy bottle with Viva Decor Croco paint and tinted it with Saddle Brown Stazon to give it a lovely golden glow.  I die cut the label using a Nestability die and stamped and embossed the words "a little festive spirit" in gold embossing powder using a PaperArtsy alphabet.  I edged the die cut with Cranberry Adirondack ink using some cut and dry foam to add a little age and depth to the label.
Obviously, the glass changes colour completely when you pop the mulled wine in...
To embellish the bottle i tinted some Prima flowers with the Stazon ink and then used Alchol Inks, dropping them directly onto the white pearl centres and letting the ink run along the veins in the flower.  I then dipped the edges of the petals into drops of ink placed onto my craft sheet to get the coppery colour around the edges of the petals.  Finally i added some Prima leaves and beads...and i think you have a pretty spectacular gift in minimal time...with maximun impact!  The lace i've used was also tinted using the Stazon so all the colours tone beautifully which really helps to create a project that *works* and looks well thought out.
Now...who can you think of in your life that needs a bottle like this..?  I think it would make a lovely gift to take to a New Years' Eve party...and if you're not a drinker...you could do a similar bottle and fill it with luxury bubble bath for an alternative kind of treat!

Happy New Year to you all, 
alixxx

November 27, 2011

a little advent idea that you still have time to make...

if you've not got yet created your own advent calendar...you might like to try this idea that i've posted onto IACW today :0)


sorry for the lack of posts lately...i'm struggling a bit with my chemo...but my brain is storing up ideas in the middle of the night {when i really would like to be asleep...} and there will be lots of things coming in the New Year :0)

November 13, 2011

I'm a creative girl!

I don't know if you've noticed...but i've been invited to join the fabulously talented DT over at Its a Creative World...and i'm sooo happy to join this super fun team who share a wide and wonderful variety of crafty ideas on their blog every day!

Today is my first offering for them...and you can see my creation and details on how to create something similar for yourself...just here.


Don't forget to add IACW to your blog list or follow us as this blog is well worth a regular look :0)

November 07, 2011

Bubbly Scrumptious update...another slice of apple

Hi all,


if you fancy seeing what i've created here...just pop on over to the Bubbly Scrumptious blog for the full details :0)

October 17, 2011

Bubbly Scrumptious update...a slice of apple


a very Autumnal feeling project for me over on the Bubbly Scrumptious blog today...i'll add a llink here when Caroline uploads it :0)

October 15, 2011

obsessed with puzzle cards...

oh me, oh my...i've only gone and made another one! ;0)


This one uses a lovely set of Andy Skinner Christmas stamps {the robin and the icicle type border}, and is super pearly and pretty irl.  It was so funny watching Ruth try to assemble it in the dim lighting of our local Chinese restaurant...lol


As always i coloured the reverse of the puzzle too before writing my Birthday message :0)

So...what i want to know now...is have you made a puzzle card yet?  i've had super feedback from those that received them in the post...Granny spent all day playing with hers! *go Gran*